Creating Distributed Availability Groups
Introduction
During this lab, you will learn how to create a distributed availability group using TSQL.
Objectives
At the end of this lab, you will be able to:
- Validate all replicas have automatic seeding enabled
- Create the Distributed Availability Group
- Join a second AG to the DAG
- Validate the secondary AG has copies of the primary AG databases
- Failover a Distributed Availability Group
Estimated Time
35 minutes
Logon Information
Use the following credentials to login into virtual environment
Connect to AlwaysOnClient as Administrator using Pa$$w0rd as the password.
Click the Type Text icon to enter the associated text into the virtual machine.
Connect to AlwaysOnN1 as CORPNET.CONTOSO.COM\Administrator using Pa$$w0rd as the password.
Click the Type Text icon to enter the associated text into the virtual machine.
Connect to AlwaysOnN2 as Administrator using Pa$$w0rd as the password.
Click the Type Text icon to enter the associated text into the virtual machine.
Connect to AlwaysOnN3 as Administrator using Pa$$w0rd as the password.
Click the Type Text icon to enter the associated text into the virtual machine.
Connect to AlwaysOnDC as Administrator using Pa$$w0rd as the password.
Click the Type Text icon to enter the associated text into the virtual machine.
Change the screen resolution if required.
You may want to adjust the screen resolution to your own preference. Do this by right-clicking on the desktop and choosing Screen resolution and clicking OK when finished.
Screenshots in the lab instructions may appear with a lesser SQL version number than is installed in the lab environment where functionality is not affected.
Exercise 1: Validate all replicas have automatic seeding enabled
In this exercise, you will learn how to validate all replicas have automatic seeding enabled
Tasks
Login to the AlwaysOnClient virtual machine as CORPNET\cluadmin using Pa$$w0rd as the password.
Click the Type Text icon to enter the associated text into the virtual machine.
Open SQL Server Management studio (SSMS), and then click Connect.

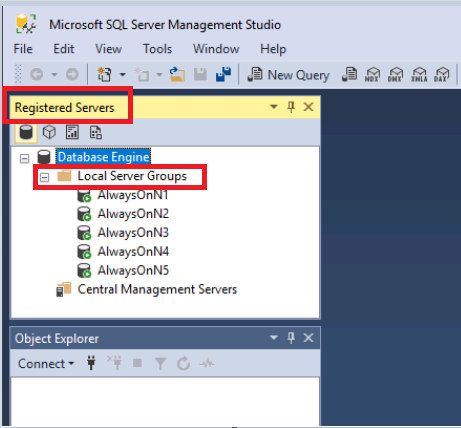
In Registered servers, expand Database Engine and navigate down to Local Server Groups
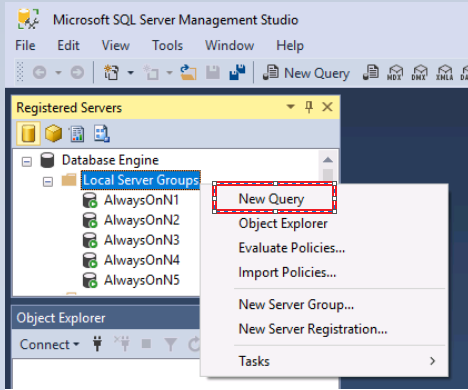
Right click Local Server Groups and select New Query.
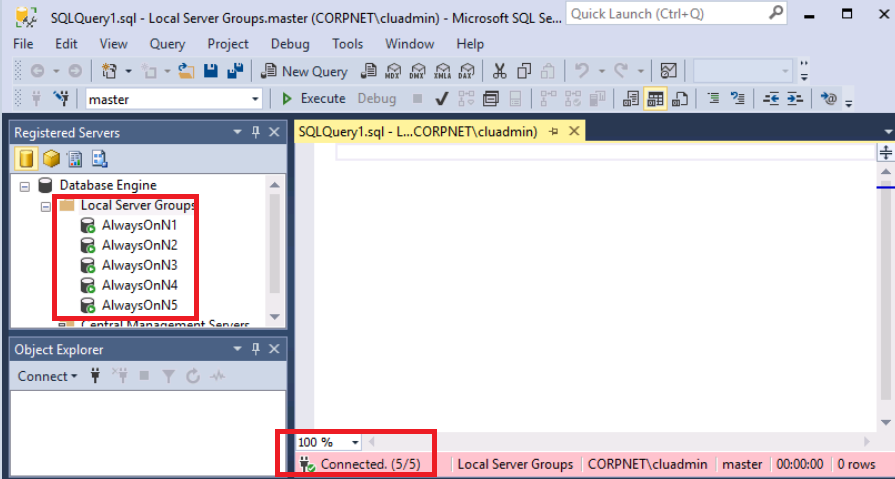
A new query window will appear.
Notice the pink status bar at the bottom that says Connected. (5/5). This means that whatever commands are issued in the query window, they will be executed to all five servers in the Local Server Groups list, namely: AlwaysOnN1 AlwaysOnN2 AlwaysOnN3 AlwaysOnN4 and AlwaysOnN5
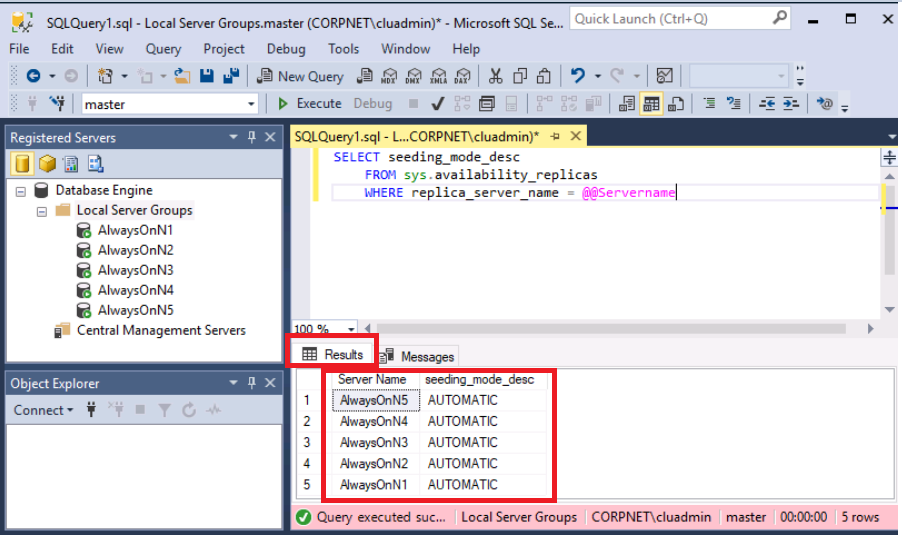
Type in the following TSQL, and press the F5 key to execute or press the Execute button.
This will query the sys.availability_replicas DMV to look at the seeding mode on all five replicas.
Open Notepad in the lab environment VM. Use the Type Text feature to enter the code into Notepad, copy the code, and then paste it into the Query Editor. This will bypass the autocomplete features in the Query Editor.
TSQLSELECT seeding_mode_desc
    FROM sys.availability_replicas
    WHERE replica_server_name = @@Servername
On the Results tab you should have 5 rows - one for each server.
They should all indicate AUTOMATIC for their seeding_mode_desc. This is a requirement for distributed availability groups.
Next, close this query window.
When prompted to save the query, click No.
Congratulations!
You have successfully completed this exercise. Click Next to advance to the next exercise.
Exercise 2: Create the Distributed Availability Group
In this exercise, you will learn how to create the Distributed Availability Group
Tasks
The next command needs to be executed on the primary replica of the "Primary Availability Group". In this case the primary availability group is AGCorp. It is not always clear which instance is the primary, so we will connect to its primary using the availability group listener for that availability group, AGCorpList.
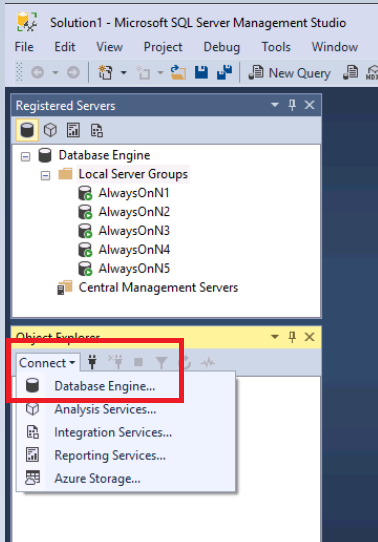
Click on the Connect button in the Object Explorer window as show in the screen caption. Select the Database Engine option.
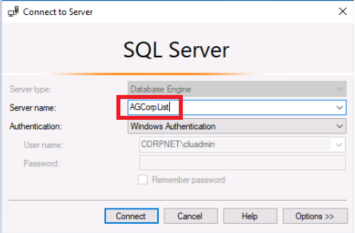
Enter the name of the availability group listener, AGCorpList and press the Connect button.
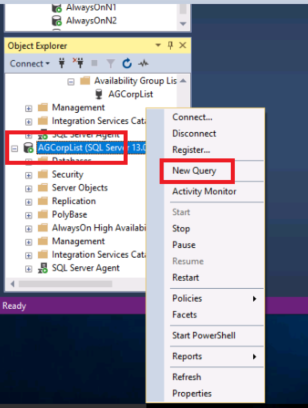
Find AGCorpList in the list of instances in the Object Explorer, right click it and select New Query
In the query window that appears, type the following TSQL and press F5 or click the Execute button to execute the script:
Open Notepad in the lab environment VM. Use the Type Text feature to enter the code into Notepad, copy the code, and then paste it into the Query Editor. This will bypass the autocomplete features in the Query Editor.
TSQLCREATE AVAILABILITY GROUP [AGCorpDistributed]
    WITH (DISTRIBUTED) AVAILABILITY GROUP ON
    'AGCorp' WITH (
        LISTENER_URL = 'tcp://AGCorpList.corpnet.contoso.com:5022',
        AVAILABILITY_MODE = ASYNCHRONOUS_COMMIT,
        FAILOVER_MODE = MANUAL,
        SEEDING_MODE = AUTOMATIC),
    'AGCorpDR' WITH (
        LISTENER_URL = 'tcp://AGCorpDRList.corpnet.contoso.com:5022',
        AVAILABILITY_MODE = ASYNCHRONOUS_COMMIT,
        FAILOVER_MODE = MANUAL,
        SEEDING_MODE = AUTOMATIC);
GO
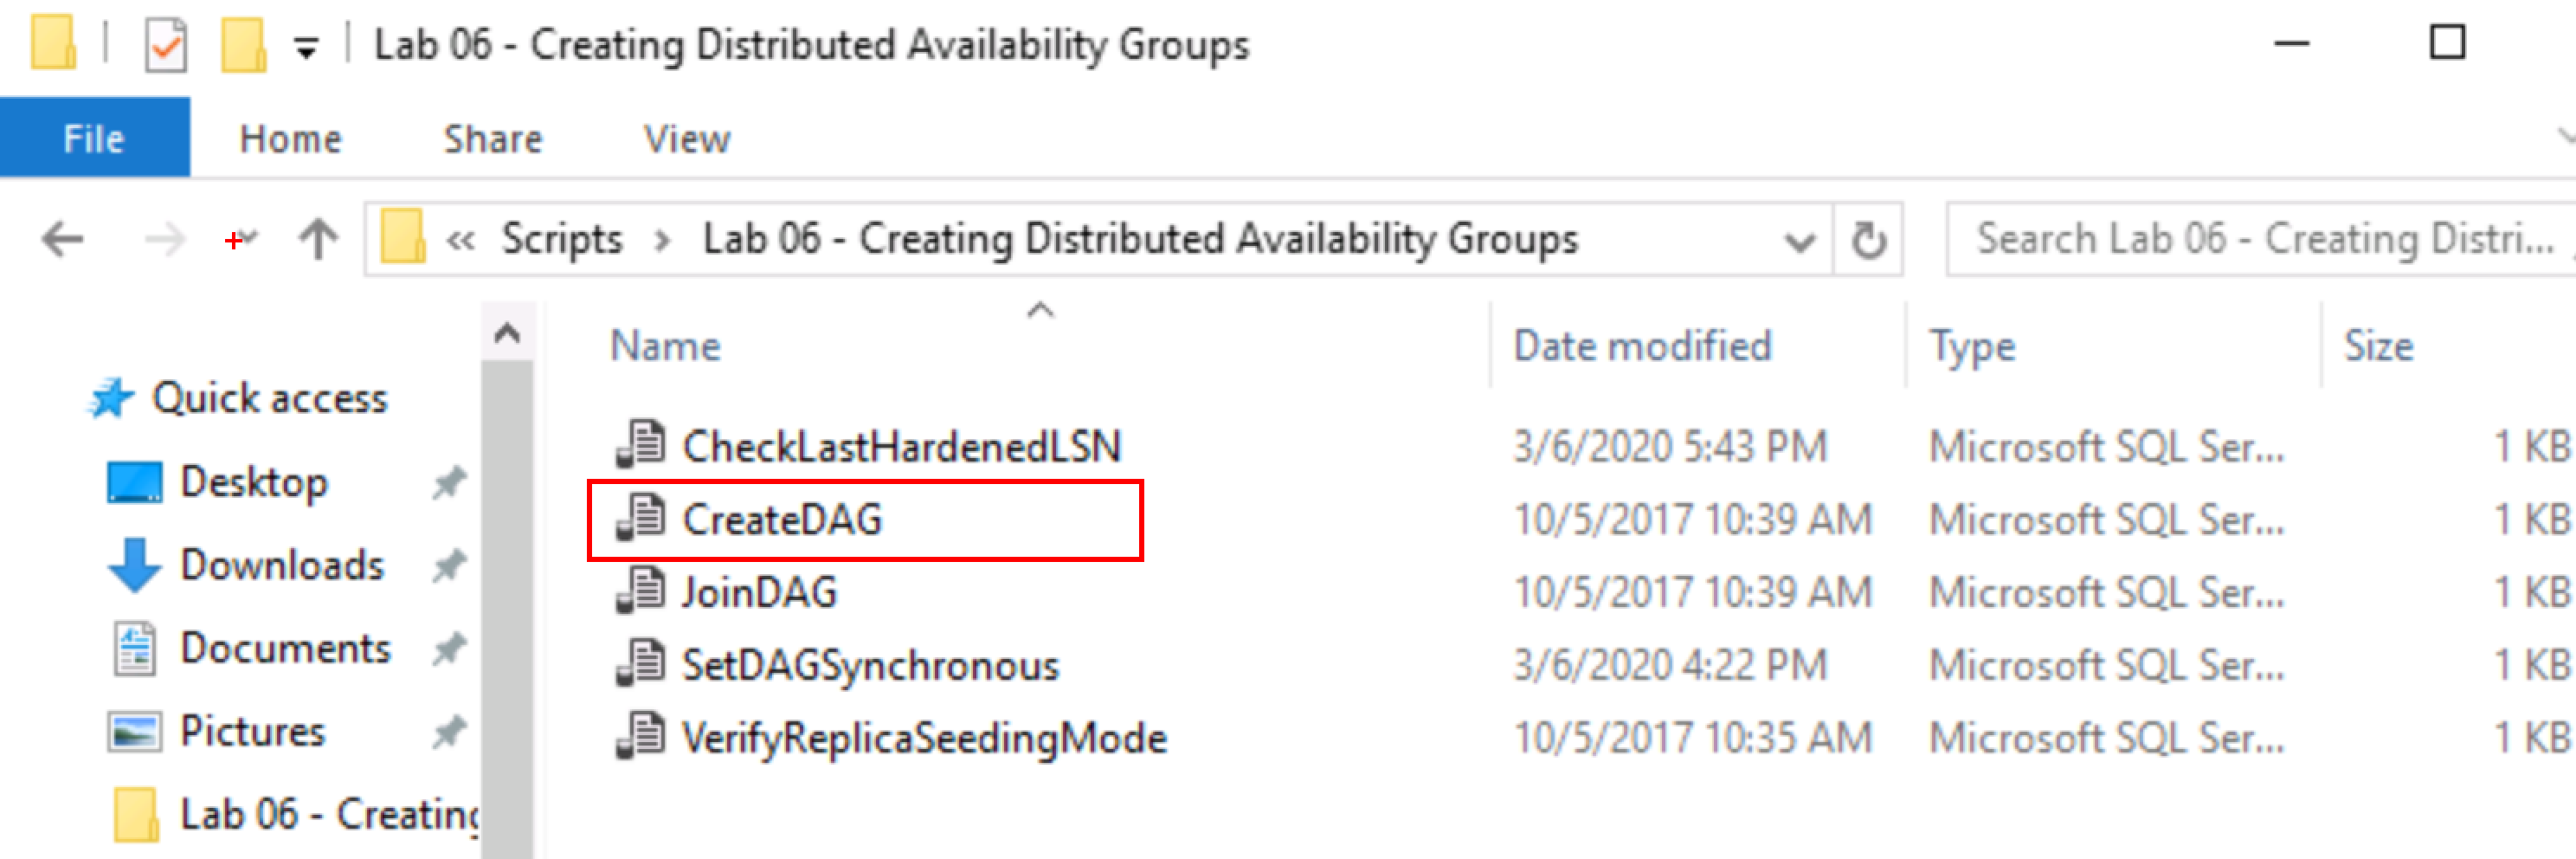
Alternatively, you can open the file, CreateDAG.SQL located in the following path on the AlwaysOnClient virtual machine. Make sure the file is connected to AGCorpList.
C:\Scripts\ Lab 06 – Creating Distributed Availability Groups
The port used for each distributed availability group LISTENER_URL (in this example 5022 for both) is the same port that the mirroring endpoint is configured to listen on, not the port that the availability group listener listens on for client communications. The LISTENER_URL tells the primary availability group where to send its traffic to the secondary availability group.
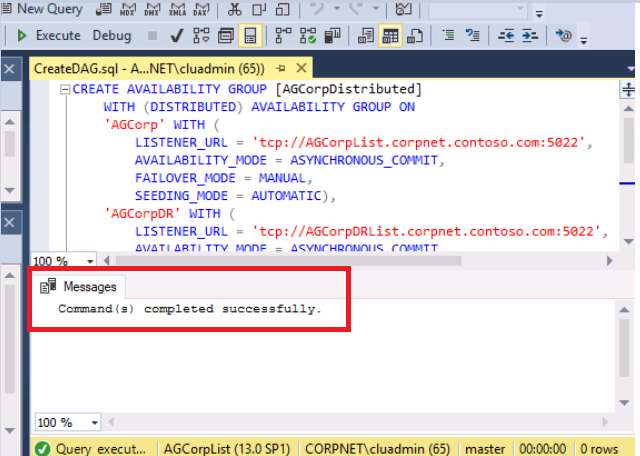
Verify the Messages tab indicated the commands completed successfully.
Congratulations!
You have successfully completed this exercise. Click Next to advance to the next exercise.
Exercise 3: Join a second availability group to the distributed availability group
In this exercise, you will learn how to join a second availability group to the distributed availability group
Tasks
For direct seeding, you must allow database creation on each secondary replica by calling ALTER AVAILABILITY GROUP with the GRANT CREATE ANY DATABASE option. In our case the secondary availability group is AGCorpDR and secondary replica is AlwaysOnN5. Connect to AlwaysonN5 and in new query window execute the command
ALTER AVAILABILITY GROUP AGCorpDR GRANT CREATE ANY DATABASE
The next command needs to be executed onto the primary replica of the "Secondary Availability Group" i.e. AGCorpDR. Connect to its primary replica using the availability group listener for that availability group, AGCorpDRList.
Click on the Connect button in the Object Explorer window as show in the screen caption. Select the Database Engine option.

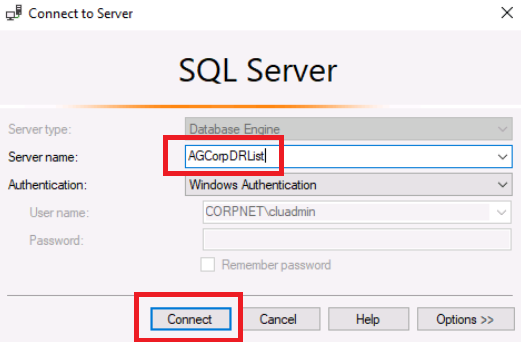
Enter the name of the availability group listener, AGCorpDRList and press the Connect button.
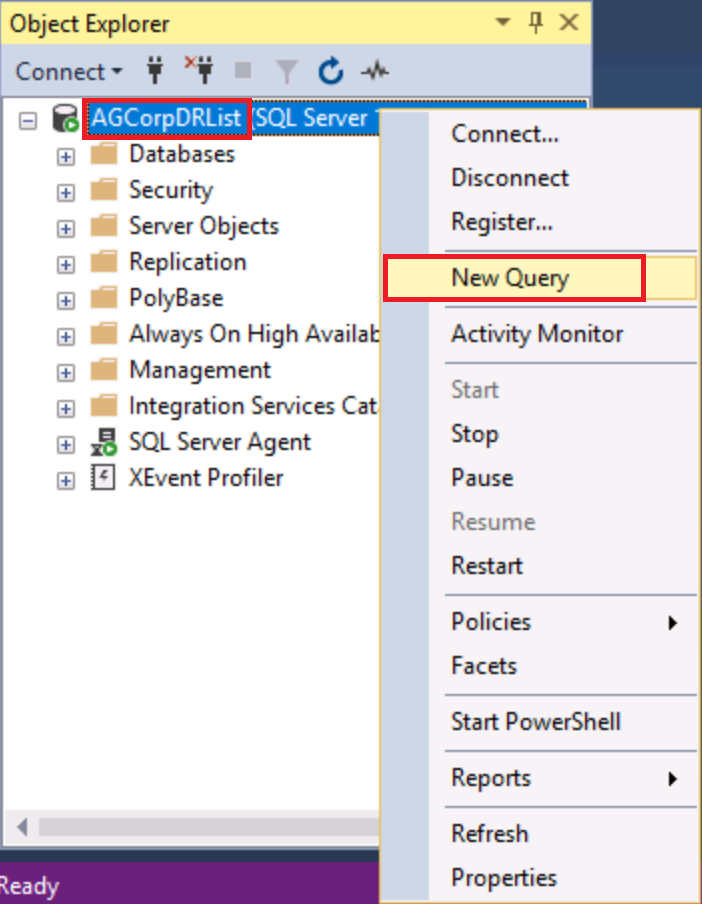
Find AGCorpDRList in the list of instances in the Object Explorer, right click it and select New Query.
In the query window that appears, type the following TSQL and press F5 or click the Execute button to execute the script:
Open Notepad in the lab environment VM. Use the Type Text feature to enter the code into Notepad, copy the code, and then paste it into the Query Editor. This will bypass the autocomplete features in the Query Editor.
TSQLALTER AVAILABILITY GROUP [AGCorpDistributed]
JOIN AVAILABILITY GROUP ON
'AGCorp' WITH (
    LISTENER_URL = 'tcp://AGCorpList.corpnet.contoso.com:5022',
    AVAILABILITY_MODE = ASYNCHRONOUS_COMMIT,
    FAILOVER_MODE = MANUAL,
    SEEDING_MODE = AUTOMATIC),
'AGCorpDR' WITH (
    LISTENER_URL = 'tcp://AGCorpDRList.corpnet.contoso.com:5022',
    AVAILABILITY_MODE = ASYNCHRONOUS_COMMIT,
    FAILOVER_MODE = MANUAL,
    SEEDING_MODE = AUTOMATIC);
GO
Alternatively, you can open the file, JoinDAG.SQL located in the following path on the AlwaysOnClient virtual machine. Make sure the file is connected to AGCorpDRList.
C:\Scripts\ Lab 06 – Creating Distributed Availability Groups

Verify the Messages tab indicated the commands completed successfully.
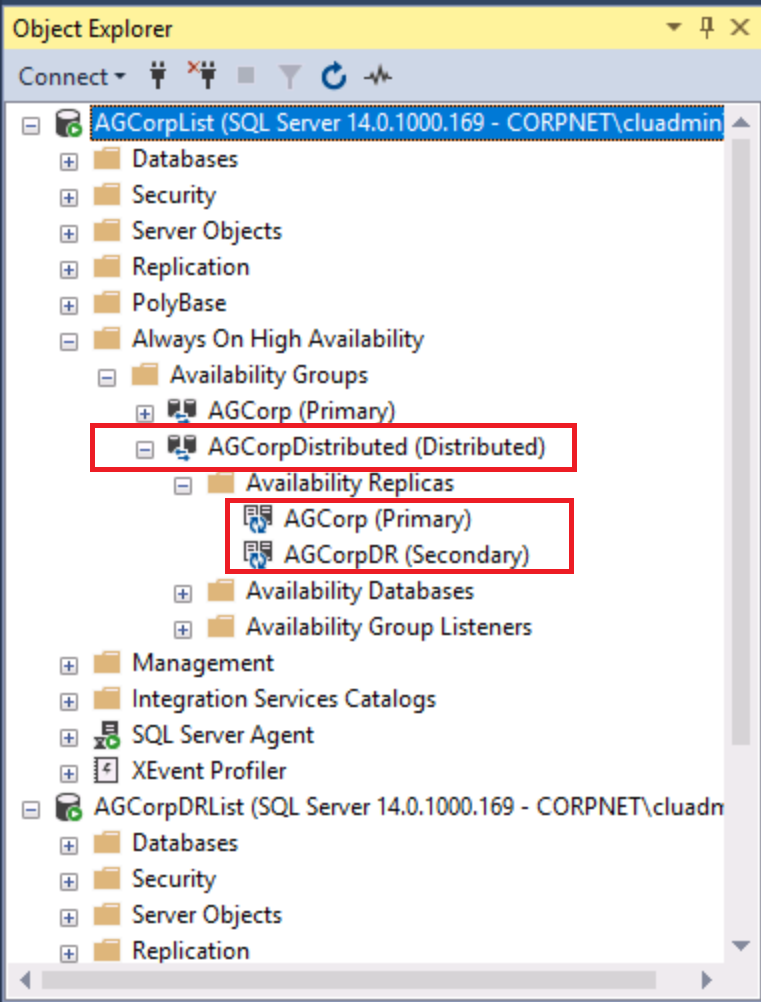
Now verify the distributed availability group exists. Re-connect to AGCorpList in SSMS Object Explorer and navigate to Availability Groups.
Notice two things;
Next to the availability group called AGCorpDistributed, it shows (Distributed)
Under the Availability Replicas for the distributed AG, it shows a primary and a secondary Availability Group name, not replica server names.
Congratulations!
You have successfully completed this exercise. Click Next to advance to the next exercise.
Exercise 4: Validate the secondary AG has copies of the primary AG databases
In this exercise, you will learn how to validate the secondary AG has copies of the primary AG databases
Tasks
At the end of exercise 3, we joined the secondary availability group to the distributed availability group. Now we need to confirm the nodes in this availability group receive the databases that the primary availability group has.
Connect to one of the two nodes in the secondary availability group, AlwaysOnN4.
Click on the Connect button in the Object Explorer window as show in the screen caption. Select the Database Engine option.

Enter the name of the replica in the secondary availability group, AlwaysOnN4 and press the Connect button.
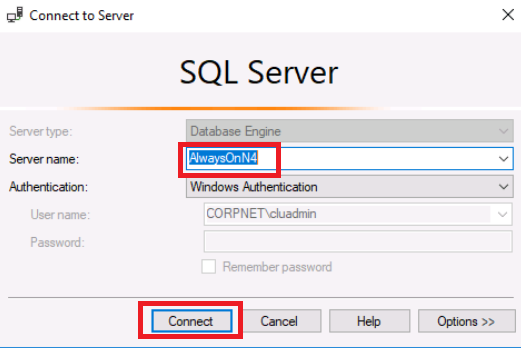
Find AlwaysOnN4 in the list of instances in the Object Explorer and navigate down to the Databases folder and expand it.
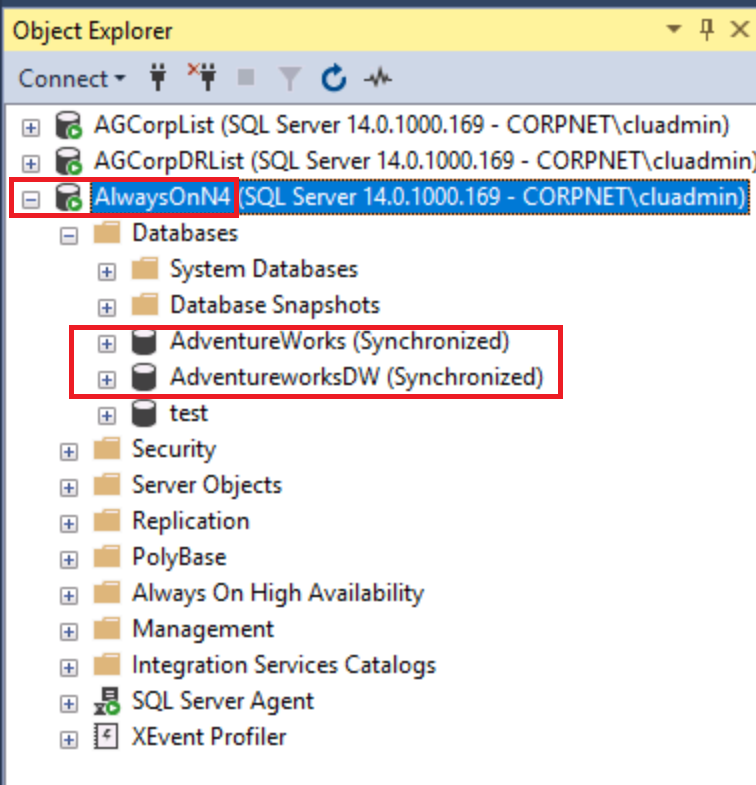
Depending on how long it takes you to open the connection to primary of the secondary AG , the state of the two databases highlighted could be "Synchronized", "Synchronizing", or "Not Synchronizing". Eventually they should show "Synchronized" as in the screen shot above.
Repeat steps 2 through 4 for AlwaysOnN5. It should also show the two new databases, AdventureWorks and AdventureWorksDW.
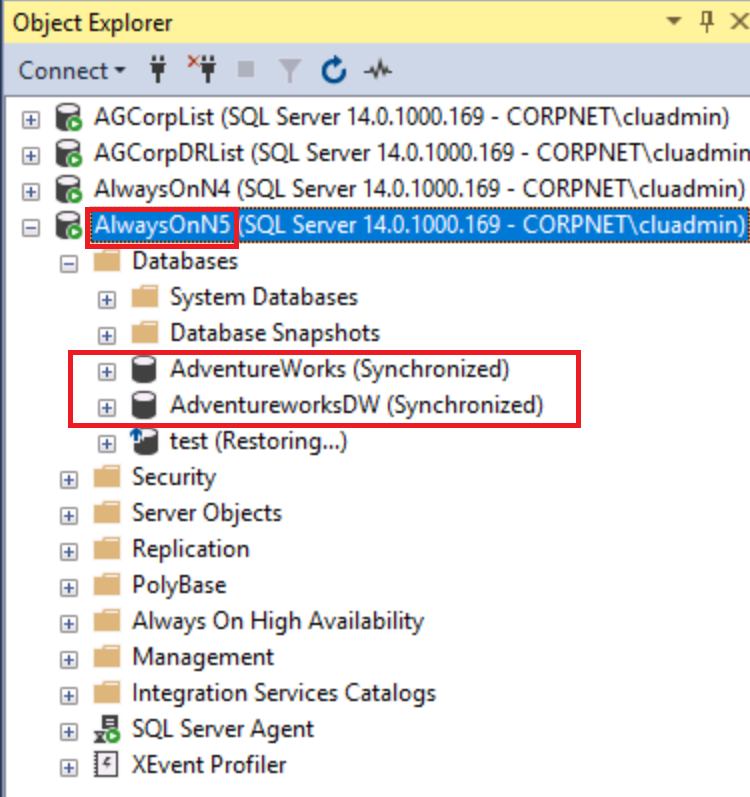
What is the state of the two databases on AlwaysOnN5?
<AlwaysOnN5DatabaseState>
If different than AlwaysOnN4, can you explain why?
<DatabaseStateDifferences>
In some cases, one of the databases may not get automatically created or ever reach a synchronized state. If that is the case, you can review the SQL Server error logs or the following DMVs in a query window:
Open Notepad in the lab environment VM. Use the Type Text feature to enter the code into Notepad, copy the code, and then paste it into the Query Editor. This will bypass the autocomplete features in the Query Editor.
TSQLSELECT * FROM sys.dm_hadr_physical_seeding_stats
SELECT * FROM sys.dm_hadr_automatic_seeding
Congratulations!
You have successfully completed this exercise. Click Next to advance to the next exercise.
Exercise 5: Failover distributed availability group
In this exercise, you will learn how to failover distributed availability group
Tasks
In the last exercise we verified the secondary availability group has copied our databases from the primary availability group and the databases are synchronized. In this exercise we will failover from the primary availability group to the secondary availabilty group.
This next command needs to be executed on both the global primary, AGCorpList, and the forwarder, AGCorpDRList, to switch the distributed availability group to synchronous commit.
Connect to the listener for the primary availability group, AGCorpList.
Click on the Connect button in the Object Explorer window as show in the screen caption. Select the Database Engine option.

Enter the name of the availability group listener, AGCorpList and press the Connect button.

Find AGCorpList in the list of instances in the Object Explorer, right click it and select New Query

In the query window that appears, type the following TSQL and press F5 or click the Execute button to execute the script:
Open Notepad in the lab environment VM. Use the Type Text feature to enter the code into Notepad, copy the code, and then paste it into the Query Editor. This will bypass the autocomplete features in the Query Editor.
TSQL-- sets the distributed availability group to synchronous commit
ALTER AVAILABILITY GROUP [AGCorpDistributed]
MODIFY
AVAILABILITY GROUP ON
'AGCorp' WITH
(
AVAILABILITY_MODE = SYNCHRONOUS_COMMIT
),
'AGCorpDR' WITH
(
AVAILABILITY_MODE = SYNCHRONOUS_COMMIT
);
GO
Alternatively, you can open the file, SetDAGSynchronous.SQL located in the following path on the AlwaysOnClient virtual machine. Make sure the file is connected to AGCorpList.
C:\Scripts\ Lab 06 – Creating Distributed Availability Groups

In a distributed availability group, the synchronization status between the two availability groups depends on the availability mode of both replicas. For synchronous commit mode, both the current primary availability group, and the current secondary availability group must have SYNCHRONOUS_COMMIT availability mode. For this reason, you must run the script above on both the global primary replica, and the forwarder.
Verify the Messages tab indicated the commands completed successfully.
Repeat steps 2 through 6 for AGCorpDRList to set the secondary availability group to synchronous commit mode.
Open a new query window and make sure you are connected to AGCorpList.
On the global primary set the availability group role to secondary.
In the query window that appears, type the following TSQL and press F5 or click the Execute button to execute the script:
Open Notepad in the lab environment VM. Use the Type Text feature to enter the code into Notepad, copy the code, and then paste it into the Query Editor. This will bypass the autocomplete features in the Query Editor.
TSQLALTER AVAILABILITY GROUP AGCorpDistributed SET (ROLE = SECONDARY);
GO
Verify the Messages tab indicated the commands completed successfully.
Wait until the status of the distributed availability group has changed to SYNCHRONIZED and all replicas have the same last_hardened_lsn (per database).
Run the following query on both the global primary, which is the primary replica of the primary availability group, and the forwarder to check the synchronization_state_desc and last_hardened_lsn:
In the query window that appears, type the following TSQL and press F5 or click the Execute button to execute the script:
Open Notepad in the lab environment VM. Use the Type Text feature to enter the code into Notepad, copy the code, and then paste it into the Query Editor. This will bypass the autocomplete features in the Query Editor.
TSQL-- Run this query on the Global Primary and the forwarder -- Check the results to see if synchronization_state_desc is SYNCHRONIZED, and the last_hardened_lsn is the same per database on both the global primary and forwarder -- If not rerun the query on both side every 5 seconds until it is the case -- SELECT ag.name , drs.database_id , db_name(drs.database_id) as database_name , drs.group_id , r.replica_server_name as replica_name , drs.synchronization_state_desc , drs.last_hardened_lsn FROM sys.dm_hadr_database_replica_states drs INNER JOIN sys.availability_groups ag ON drs.group_id = ag.group_id INNER JOIN sys.availability_replicas r ON drs.replica_id = r.replica_id; GOAlternatively, you can open the file, CheckLastHardenedLSN.SQL located in the following path on the AlwaysOnClient virtual machine. Make sure you run the file connected to AGCorpList.
C:\Scripts\ Lab 06 – Creating Distributed Availability Groups

Verify the Messages tab indicated the commands completed successfully.
Repeat step 11 thru 13 for AGCorpDRList
Now that the distributed availability group is synchronized and all availability replicas have the same last_hardened_lsn we are ready to failover the distributed availability group.
Find AGCorpDRList in the list of instances in the Object Explorer, right click it and select New Query.

In the query window that appears, type the following TSQL and press F5 or click the Execute button to execute the script:
Open Notepad in the lab environment VM. Use the Type Text feature to enter the code into Notepad, copy the code, and then paste it into the Query Editor. This will bypass the autocomplete features in the Query Editor.
TSQLALTER AVAILABILITY GROUP AGCorpDistributed FORCE_FAILOVER_ALLOW_DATA_LOSS;
GO
After completing the steps above, the distributed availability group fails over without any data loss. If the availability groups are across a geographical distance that causes latency, change the availability mode back to ASYNCHRONOUS_COMMIT.
To fail the distributed availability group back from AGCorpDistributed to AGCorpList repeat the above steps.
Congratulations!
You have successfully completed this exercise. Click Next to advance to the next exercise.
Exercise 6: Monitor distributed availability group health
In this exercise, you will learn how to monitor distributed availability group health
Tasks
In exercise 4, we set the distributed availability group in synchronous commit mode and failed over to the secondary availability group. In this exercise we will monitor the health of our distributed availability group.
The distributed availability group is SQL Server-only-construct and is not seen in the WSFC cluster. Also, in SQL Server Management Studio you will only see the existence of the distributed availability group and its replicas. The availability databases and availability group listeners are all empty. This may change in future versions of Management Studio but for now we will monitor the health of our availability group using T-SQL scripts.
Connect to the listener for the primary availability group, AGCorpList.
Click on the Connect button in the Object Explorer window as show in the screen caption. Select the Database Engine option.

Enter the name of the availability group listener, AGCorpList and press the Connect button.
 1. [] Find AGCorpList in the list of instances in the Object Explorer, right click it and select New Query
In the query window that appears, type the following TSQL and press F5 or click the Execute button to execute the script:
Open Notepad in the lab environment VM. Use the Type Text feature to enter the code into Notepad, copy the code, and then paste it into the Query Editor. This will bypass the autocomplete features in the Query Editor.
TSQLSELECT
    ag.[name] AS [Distributed AG Name],
    ag.Is_Distributed,
    ar.replica_server_name AS [Replica Name]
FROM sys.availability_groups AS ag
INNER JOIN sys.availability_replicas AS ar
    ON ag.group_id = ar.group_id
WHERE ag.Is_Distributed = 1
GO
On the Results tab you should see two rows listing the name of your distributed availability group and the names of the replicas in the distributed availability group.
Repeat steps 2 and 3 to connect to AGCorpList and open a new query window.
Run the following query on the global primary, which is the primary replica of the primary availability group, to display the health of the distributed availability group.
In the query window that appears, type the following TSQL and press F5 or click the Execute button to execute the script:
Open Notepad in the lab environment VM. Use the Type Text feature to enter the code into Notepad, copy the code, and then paste it into the Query Editor. This will bypass the autocomplete features in the Query Editor.
TSQLSELECT
    ag.[name] AS [Distributed AG Name],
    ag.is_distributed,
    ar.replica_server_name AS [Underlying AG],
    ars.role_desc AS [Role],
    ars.synchronization_health_desc AS [Sync Status]
FROM  sys.availability_groups AS ag
INNER JOIN sys.availability_replicas AS ar
    ON  ag.group_id = ar.group_id
INNER JOIN sys.dm_hadr_availability_replica_states AS ars
    ON  ar.replica_id = ars.replica_id
WHERE ag.is_distributed = 1
GO
On the Results tab you should see two rows, one for each of the availability groups in the distributed availability group. The Sync Status column shows the health of each availability group in the distributed availability group.
Repeat steps 2 and 3 to connect to AGCorpList and open a new query window.
To further extend the previous query, you can also see the underlying performance via the dynamic management views by adding in sys.dm_hadr_database_replicas_states. The dynamic management view currently stores information about the second availability group only.
Run the following query on the global primary, which is the primary replica of the primary availability group, to display the performance of the distributed availability group.
In the query window that appears, type the following TSQL and press F5 or click the Execute button to execute the script:
Open Notepad in the lab environment VM. Use the Type Text feature to enter the code into Notepad, copy the code, and then paste it into the Query Editor. This will bypass the autocomplete features in the Query Editor.
TSQLSELECT
    ag.[name] AS [Distributed AG Name],
    ar.replica_server_name AS [Underlying AG],
    dbs.[name] AS [Database],
    ars.role_desc AS [Role],
    drs.synchronization_health_desc AS [Sync Status],
    drs.log_send_queue_size,
    drs.log_send_rate,
    drs.redo_queue_size,
    drs.redo_rate
FROM sys.databases AS dbs
INNER JOIN sys.dm_hadr_database_replica_states AS drs
    ON dbs.database_id = drs.database_id
INNER JOIN sys.availability_groups AS ag
    ON drs.group_id = ag.group_id
INNER JOIN sys.dm_hadr_availability_replica_states AS ars
    ON ars.replica_id = drs.replica_id
INNER JOIN sys.availability_replicas AS ar
    ON ar.replica_id = ars.replica_id
WHERE ag.is_distributed = 1
GO
On the Results tab you should see two rows, one for each of the availability groups in the distributed availability group. The columns for the secondary availability group show the performance of the distributed availability group, specifically the log send queue size and rate and redo queue size and rate.
Congratulations!
You have successfully completed this exercise. You can move to the next lab.